No Bake White Chocolate Oreo Fridge Cake

No Bake White Chocolate Oreo Fridge Cake

INGREDIENTS

• 170g unsalted butter
• 400g white chocolate
• 397g condensed milk (1 can)
• 2 pack of Oreo biscuits, crushed
• 100g dark chocolate (or milk)
• 1 tsp vegetable oil
• 4 Oreo Biscuits, crushed

METHOD
1. Line a loaf tin with baking paper. I use these from Amazon Loaf Tin Liners
2. Break the biscuits up into a bowl, just do this with your hands as you want the pieces to be quite chunky!
3. Put the chocolate and butter in a bowl and microwave for 30 second bursts until melted and smooth. Stir really well between each one, it will take roughly 1 min 30 in total.
4. Pour in the condensed milk and stir to combine
5. Add the crushed biscuits and then gently mix
6.Pour into the loaf tin, press down and level off as best as you can. Pop in the fridge for 2-3 hours until just set.
7. Once set, turn out on to a plate.
8. To decorate, melt the dark chocolate and vegetable oil in a bowl, in the microwave on 30 second bursts stirring after each one. Spoon over the top of the cake and encourage it to drip down the sides. 9. 9. Sprinkle the remaining 4 crushed Oreo biscuits over the top, pop back in the fridge for a further 30 minutes to set.
10. Remove from fridge for serving and serve in slices. Keep it stored in the fridge.
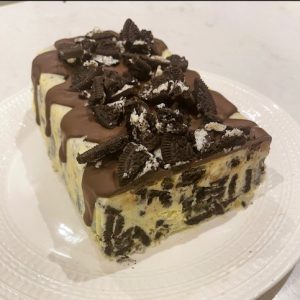
 

ENJOY! If you opt for No Bake Biscoff Fridge Cake, please do share a picture!
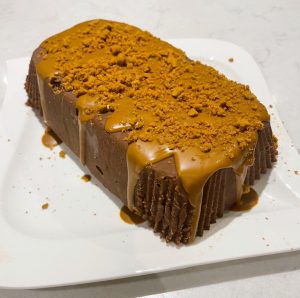

No Bake Biscoff Fridge Cake

No Bake Biscoff Fridge Cake

INGREDIENTS

• 170g unsalted butter
• 400g milk chocolate
• 397g condensed milk (1 can)
• 1 pack of Lotus Biscoff biscuits, crushed
• 3 tbsp Biscoff spread
• 2 Lotus Biscuits, crushed

METHOD
1. Line a loaf tin with baking paper. I use these from Amazon Loaf Tin Liners
2. Break the biscuits up into a bowl, just do this with your hands as you want the pieces to be quite chunky!
3. Put the chocolate and butter in a bowl and microwave for 30 second bursts until melted and smooth. Stir really well between each one, it will take roughly 1 min 30 in total.
4. Pour in the condensed milk and stir to combine
5. Add the crushed biscuits and then gently mix
6.Pour into the loaf tin, press down and level off as best as you can. Pop in the fridge for 2-3 hours until just set.
7. Once set, turn out on to a plate.
8. To decorate, melt the Biscoff Spread in a bowl, in the microwave, this will only for 30 seconds. Spoon over the top of the cake and encourage it to drip down the sides. 9. 9. Sprinkle the remaining 2 crushed Biscoff biscuits over the top, pop back in the fridge for a further 30 minutes to set.
10. Remove from fridge for serving and serve in slices. Keep it stored in the fridge.


ENJOY! If you opt for No Bake Biscoff Fridge Cake, please do share a picture!
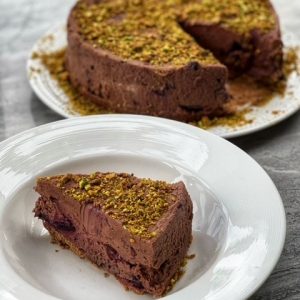

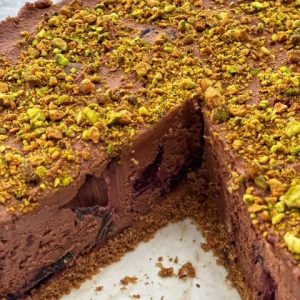
Black Forest & Pistachio Cheesecake (No Bake)

Black Forest & Pistachio Cheesecake

This no bake, rich, delicious cherry and pistachio no bake cheesecake makes the perfect weekend treat. Its one of the most simple recipes you could ever create, yet maximises on flavour and tasty joy!

INGREDIENTS

Base
50g unsalted butter (melted)
300g milk chocolate digestives

Cheesecake
300ml double cream
500g mascarpone
100g icing sugar
200g milk chocolate (melted)
200g dark chocolate (melted)
200g fresh cherries (pitted and chopped )
100g Morello cherry jam
100g pistachios (finely chopped – I use a food processor for this)

METHOD

1. Line a deep 8 inch loose bottom cake tin with grease proof paper.

2. Using a food processor blitz the digestives to a fine crumb, then add in the melted butter and pulse until all combined.

3. Press down the biscuit base into the bottom of the lined tin and push down so it is even using the back of a spoon. Refrigerate whilst you make the cheesecake.

4. Put the mascarpone, cream, melted chocolates and icing sugar in a large bowl with an electric hand mix or a stand mixer and beat until it is all combined and thick (if you over work add a couple of tbsp of milk and beat again).

5. Add in the Morello jam and beat again briefly

6. Fold in the chopped cherries with a wooden spoon or spatula.

7. Remove the base from the fridge and spoon on top level off with the back of a spoon.

8. Scatter the finely chopped pistachios all over the surface. Then pop back in the fridge to firm up for around 3-4 hours.

9. When ready to serve, remove from the fridge and take out of the spring form tin on to a plate. (Tip – use a knife around the edge of the cheesecake before removing from the tin.

10. Store in the fridge and will last around 4 days.


ENJOY! If you opt for Black Forest & Pistachio Cheesecake, please do share a picture!


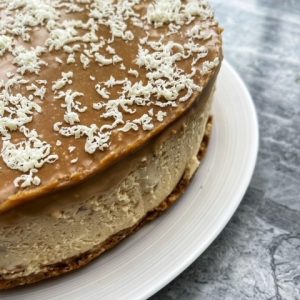
Chocolate & Peanut Butter No Bake Cheesecake

Chocolate & Peanut Butter No Bake Cheesecake

A no bake cheesecake with a few twists, topped with a blonde chocolate ganache it really adds a gorgeous different texture to the whole thing. If you can’t get your hands on the golden blonde chocolate (I used one from M&S Simply Food which is their own brand in with the baking ingredients called “ingredients for cooks” – it’s absolutely delicious!), you can always sub in a milk chocolate. This recipe is absolute min effort, maximum reward too.

I prefer to use crunchy peanut butter as I really like the texture in the cheesecake, but again if you want to use smooth just swap it!

INGREDIENTS

Base
300g chocolate digestives
75g melted unsalted butter

Filling
400g full fat cream cheese
500g mascarpone
300ml double cream
300g crunchy peanut butter
6 heaped tbsp icing sugar
1 tsp vanilla essence

Ganache
300g golden blonde chocolate
300ml double cream
40g crunchy peanut butter

METHOD

1. Line the base of a 23cm springform tin and grease the sides.

2. Crush the digestives either using a rolling pin or in a blender (I use a magimix) until they are a fine crumb.

3. Stir in the melted butter and tip into the base of the tin. Using the back of a spoon pat down until even and firm across the base. Put to one side whilst you make the filling.

4. Put the cream cheese, mascarpone, vanilla essence and double cream into a bowl and using either a hand or stand mixer beat for a couple of minutes, this gives the cream chance to thicken as well as combining the ingredients.

5. Add the icing sugar and beat again until well combined

6. Add the peanut butter and then beat again until fully combined.

7. Spoon on top of the biscuit base and smooth across for an even fill, pop in the fridge whilst you make the ganache.

8. Break the chocolate up into small pieces and pop in a heat proof bowl, add the peanut butter on top.

9. Add the cream to a saucepan and bring to a very low simmer, remove from the heat and pour over the chocolate.

10. Leave to stand for a few minutes before then mixing thoroughly with a balloon whisk until it has fully combined and you have a smooth, pourable ganache. (if you haven’t heated the cream quite enough and so all the chocolate hasn’t melted pop in the microwave for 10 second intervals, keep stirring after each time as you don’t want to overheat).

11. Remove the cheesecake from the fridge and pour the ganache over the top.

12. Optional: grate some white chocolate over the top

13. Put back in the fridge and leave in there for 3-4 hours before removing to serve.

Store in the fridge


ENJOY! If you opt for Chocolate & Peanut Butter No Bake Cheesecake, please do share a picture!